ConsignO Cloud User Guide
Importing contacts into the address book
Available with: Individual plan Business plan Enterprise plan
Management of the address book can be simplified by using the CSV Import functionality within the address book menu. Contacts can then be added in bulk instead of manually one by one. Two steps must be followed.
Step 1: Download of the template file and definition of entries
Step 2: Entries import in the address book
![]() This functionality can be used to import contacts of type Trusted electronic signature only and not of type CertifiO digital signature.
This functionality can be used to import contacts of type Trusted electronic signature only and not of type CertifiO digital signature.
STEP 1: Download of the template and definition of entries
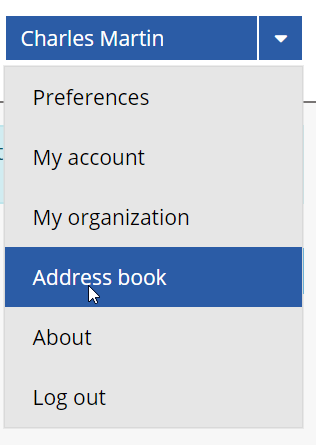
1. To start, click on the arrow to the right of your name at the top section of the window and select Address book.

2. Click on the “burger” menu on the top right and select CSV Import.

3. In the Contacts Import window, click on the Download template button. This action will download on your local drive in the download directory of your browser the template file to be used. Open the file.

4. Entries can now be added in the file as described in the first line of the template. The first line is always ignored when file is uploaded, so it must not be deleted and replaced with a real entry.
The following fields are always mandatory:
- Firstname
- Lastname
- Second factor (sms or call or secret or saml)
- Must be one of these values:
- sms
- call
- secret
- saml
- Language
- en
- fr
- Must be one of these values:
The following fields might be mandatory based on the value of the previous ones:
- Phone
- Is mandatory if second factor is call or sms
- Must be in international format without the + ex : 15141234567
- Add space and # for extension: ex #1234
- This is the number to which the second factor will be sent to
- Question
- Mandatory is second factor is secret
- Question to be shown to signer as the second factor
- Response
- Mandatory if second factor is secret
- Answer to be entered by the signer as the second factor
- i. IDP name (if SAML is used.)
5. Save the file to a known directory.
STEP 2: ENTRIES IMPORT INTO THE ADDRESS BOOK
6. To import entries, go back to the CSV Import menu. Select the address book to which entries must be imported. Based on your role, you might have different options, such as My address book or Organization’s address book.

7. Select the proper template file on your drive using the Select the file to upload button or Drag and Drop the file directly within the window.

Filename should be shown

8. Select Import

9. Select Import with or without propagation
The action is dynamic and may vary based on the existence or not of contact and ongoing signature projects with those contacts.

10. A Result window will popup with the outcome of the import: a confirmation of entries added or errors (if some information was missing from the input template file).

11. Select Close
Contacts should now be added within the proper address book.
